You can still play a blackjack hand blackjack hand or two even with Ubuntu, as long as you use the blackjack odds charts, casino blackjack strategy, and Blackjack Tip guides from CasinoBonus.org!
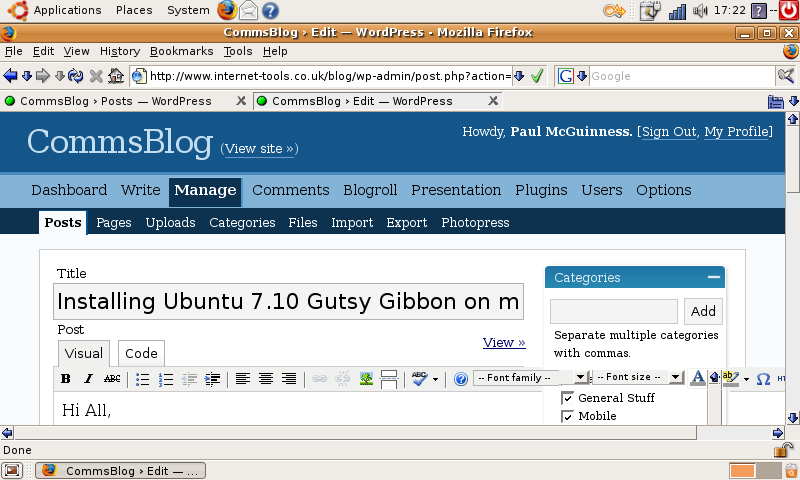
Click on the Pic to see a bigger version
Hi All,
Well I went and got myself an Asus Eee PC the other day. What a fantastic piece of kit… but I have to say I didn’t like the OS much. You either have a ‘fisher price’ Xandros Linux desktop, or a Xandros KDE based one… Personally (and I am new to linux) I prefer Ubuntu’s Gnome-based layout.
Now in theory, this shouldn’t be too hard, but in order to make sure that this all works properly, I spent a great deal of time researching the process at EeeUser.com and various other sites.
This is my ‘How to’
- Reboot your Eee PC and ensure that the boot sequence is set to ATAPI CD Rom as the first choice.
- Plug in a USB CD Caddy and insert your Ubuntu 7.10 Gutsy Gibbon Live CD (Download Here)
- Once booted, click on Applications, Terminal and type gconf-editor
- Browse to apps/compiz/plugins/move/allscreens/options and uncheck constrain_y (Full details Here) – This allows you to move any window up beyond the height of the screen, which is very much needed during this install.
- Double Click on the “Install” Icon on the Desktop. Any time a window doesn’t fit, hold down the Alt key and drag the window off the top of the screen so you can see the buttons.
- Go through all the normal bits until you get to the Partitioning. Select manual and delete all the existing partitions. Create one partition of 4001Mb that is EXT2 and has a mount point of “/” – Ignore any “swap partition” warnings.
- Complete Install (answering any obvious questions accordingly)
- Reboot (after removing the CD)
- Redo Step 4 again (it gets lost in the install)
- Acknowledge the Athos “Restricted Driver” message
- Minimise Disk Writes (All obtained from Eeeuser.com) by doing the following:-
- Adding the following to /etc/fstab tmpfs /var/log tmpfs defaults,noatime 0 0
- Repeat for /tmp, /var/lock, /var/run and /var/tmp
- Set defaults,noatime 0 2 on the main ext2 partition (See HERE for more details) to prevent excessive wear and tear on your SSD
- If you ignored me and added a swap partition as well, then edit the /etc/sysctl.conf and add a line at the end that says vm.swappiness=0 this will tell the OS to use RAM in preference to Swap files.
- Go into Add/Remove, and remove the pointless applications that are taking up room on your little 4Gb SSD… I removed the following:-
-
- Most of the games (Really…How often are you actually going to play these?)
- F-spot Photo Manager (I user Flikr, so not needed)
- OnBoard (on-screen keyboard… not needed as we have one!)
- Orca (I can see just fine thank you…)
- Xsane (Nope… no scanners or faxes plugged into my Eee)
- Get your GMAIL all set up (Samsung tips here apply equally well… http://www.internet-tools.co.uk/blog/index.php?s=gmail)
Ok. So we have a working Eee PC running Ubuntu, but there are a few things ‘Broken’…. Battery Indicator, Wireless Lan, Webcam, Power Buttons, Lid sensor, Skype…..
Go the the Eeeuser.com site HERE to fix these issues (far to long to cut’n’paste here) and pn Samiux’s Blog HERE
But things I did fix from the Eeeuser site were:-
- Wireless network (via ndiswrapper method)
- Suspend/Resume/Power Down issues
- Webcam support (you have to enable it in the BIOS for Ubuntu to see it – it will reboot twice once enabled)
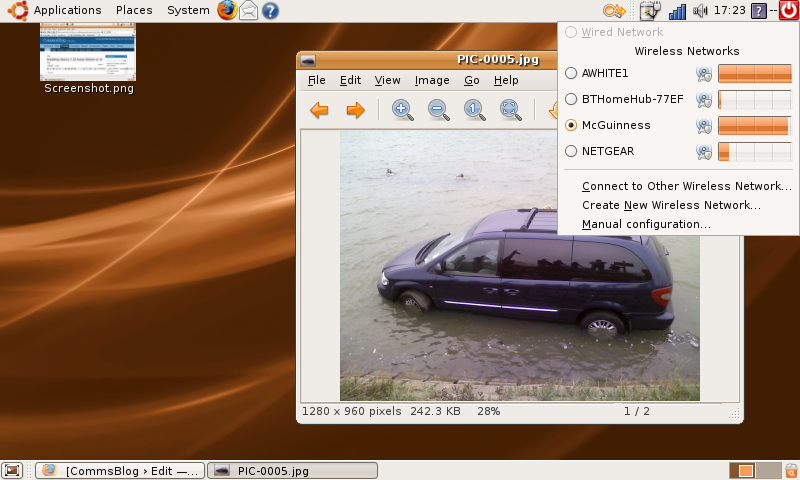
Click on the Pic to see a bigger version
- Installed the ‘Littlefox’ theme into FireFox (takes up much less screen real-estate)
- Went into Appearance Preferences and set:-
- All the fonts to 8pt
- Icons to “Icon Only” (no text)
- Adjusted mouse sensitivity (wasn’t detecting my touchpad-taps very well)
- Set both status bars to 19 pixels in height
- Added my networked HP printer (I use a wireless gateway adapter connected to the Ethernet port on the OfficeJet)
Then I added some goodies…
- Enabled all the repositories in System, Administration, Software Sources
- Updated everything by going into System, Administration, Update Manager
- Installed all the BlueTooth stuff (so I can beam from my Samsung to the Eee PC)
- Installed Camorama (Web Cam Capture and Test App)
- Installed v2 of Skype (it has webcam support under linux)
And thats it…. all working, and I am in fact completing this blog entry on my Eee PC with Ubuntu!
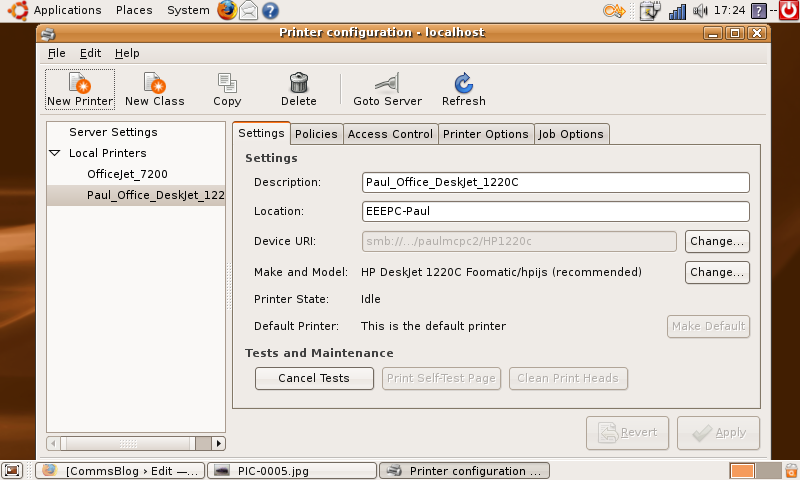
Click on the Pic to see a bigger version
27th November – NOTE: When installing the ndiswrapper, make sure you place the ndis folder that you downloaded from the cd/website somewhere sensible! I deleted the folder (thinking that ndiswrapper would copy the relevant files somewhere) and spent 2 hours trying to get my wireless lan working again 🙁
29th November – Added some screenshots of it in action.
30th November – Firstly… sorry if you haven’t been able to view this blog… Fasthosts cobbled my MySQL server 🙁 Secondly… I have had a minor problem (irritating, more than an issue) where the Eee PC will randomly reboot during the initial boot sequence. Essentially it gets ‘stuck’ about 20% through the first Ubuntu progress bar, and then reboots just fine. Haven’t sussed what it is yet, but it only happened after I enabled the Webcam in the BIOS…
19 Responses
If you edit the /boot/grub/grub.conf file and remove the quiet kernel boot option then you should be able to see where the computer is hanging during boot.
Cheers for that Dan – I am a complete Linux newbie, so all this information I’ve compiled is from stuff I’ve gleaned from other sites and a *lot* of trial-and-error!
[…] das Betriebssystem auf dem Asus Eee nicht gefällt kann es austauschen. Wer Ubuntu 7.10 mag findest hier die Anleitung zur Installation auf dem […]
[…] Ubuntu 7.10 Gutsey Gibbon on an Asus Eee PC – Link EeeUser.com Wiki: Ubuntu 7.10 on Eee PC – […]
[…] there are some pretty useful instructions for doing this on the Eeeuser wiki that I found via this helpful blog post. Launch the Terminal by navigating to Applications—>Accessories—Terminal via the menu […]
[…] This new install lacks the draggable windows we set up on the USB stick, so repeat step 4. Now (taking some ideas from here) go to System—>Preferences—>Appearance and click on the Fonts tab. Change the […]
[…] stendere questo post ho utilizzato il wiki di eeeuser.com e un utilissimo post di Paul McGuinnes Questo post è stato scritto da antonde e pubblicato il Dicembre 13, 2007 alle 4:44 pm in asus […]
Wow, thanks for the manual to install ubuntu on my asus eee pc.
[…] 可以换个触摸屏
[…] Now as you all know, I *love* my Eee PC, and have spent some time making sure I could get Ubuntu working on it […]
[…] Ubuntu, après Windows, voici venu Mac OS X Leopard sur le Asus […]
[…] vu l’engouement pour cette machine: désormais il est possible d’installer dessus Ubuntu (linux), Windows et enfin Mac OSX […]
[…] pour ce qui est de Ubuntu c’est assez simple et les étapes sont plus ou moins faciles , justes quelques précautions particulières pour l’installation des driver de la carte wifi , web cam et autres … les détails c’est par içi […]
[…] 900 Mhz from the normal 630 Mhz (which is 70% of 900 Mhz of course!). You must if course be running Ubuntu to do […]
hi Paul, would you know if I can still restore my asus eee to factory settings after I changed the current OS?
thanks very much in advance.
Yes you can. The recovery DVD lets you restore it all back. Asus actually encourage you to try other OS’s on the Eee PC, and provide instructions for WinXP.
Regards,
Paul
[…] wie gewohnt Ubuntu von CD installierten, das übliche Update der Pakete durchlaufen lassen und danach* dieses Skript laufen lassen. Das […]
[…] CommsBlog » Blog Archive » Installing Ubuntu 7.10 Gutsy Gibbon on my Asus Eee PC (tags: Ubuntu linux eeepc eee howto install asus) […]
[…] testade att installera Ubuntu på den och det funkade finfint det också med lite småtrix från CommsBlog, den klarade av alla effekter inklusive 3d-fönster och annat tingel-tangel, imponerande! Jag har […]